
Lulzbot Mini 3D Printer Instructions
The Lulzbot Mini 3D printers are both attached to the Windows computer in the room of long tables. The steps involved in creating a 3D print include:
- Connecting to the printer
- Getting a .STL file of your 3D object into Cura
- Preparing for the print
- Making sure your selected plastic matches the Cura print settings
- Printing your 3D object
- Cooling off the print bed before removing your objects
Connecting to the printer
- In the Windows computer. launch Cura by clicking the yellow-green C icon on the menu bar.
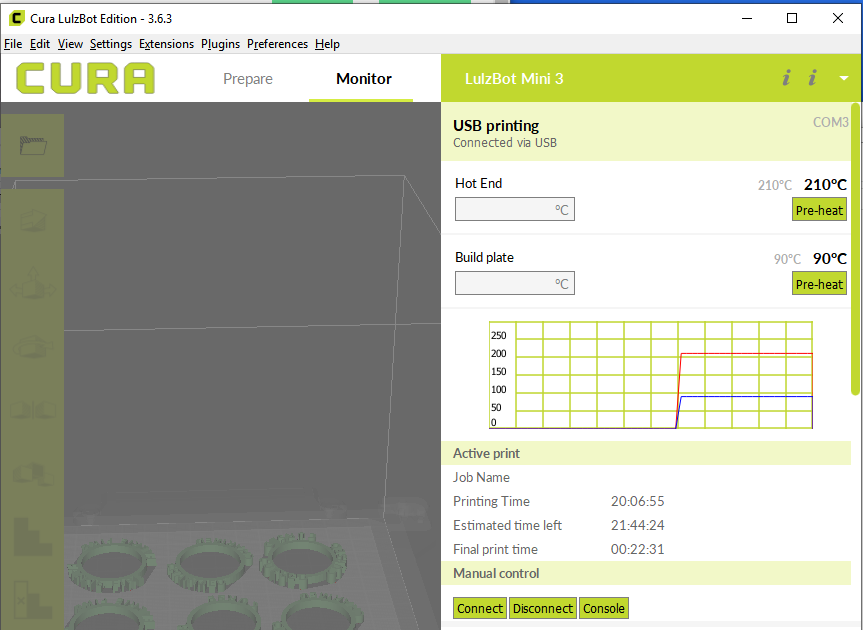
- Make sure that Cura is aware of your printer by clicking Monitor, then Connect.
- If you can’t connect to the printer, check to make sure the USB cables are connected and the printer is turned on.
- If everything’s connected and powered on, restarting the Windows computer may help.
Getting a .STL file of your 3D object into Cura
Whether you’re creating a new object in Tinkercad or downloading an existing creation from Thingiverse, the .STL file format defines a 3D shape. Cura combines the 3D shape with its awareness of the selected plastic and temperature in order to slice that shape into objects that can be 3D printed.
- Either use a USB stick to transfer the .STL file to the Windows computer or download your .STL file from an online source.
- Under File, click Open File(s)
- Select your .STL file. Cura will place it on the representation of the print surface.
Preparing for the print
With many 3D printers, leveling the print surface and adjusting the plastic settings are important actions. Fortunately, the Lulzbot and Cura combination will handle most of that for you! However, you do need to tell the printer what it’s got to work with.
Making sure your plastic matches the Cura print settings
If the plastic that’s already in the printer matches what you want for your project, great! (If it doesn’t, see How to change the plastic.)
- Look for any labels on the spool of plastic that’s feeding into the printer. The important elements to look for:
- Is this PLA or some other type of plastic?
- Temperature for the nozzle (“print temperature”)
- Temperature for the print bed
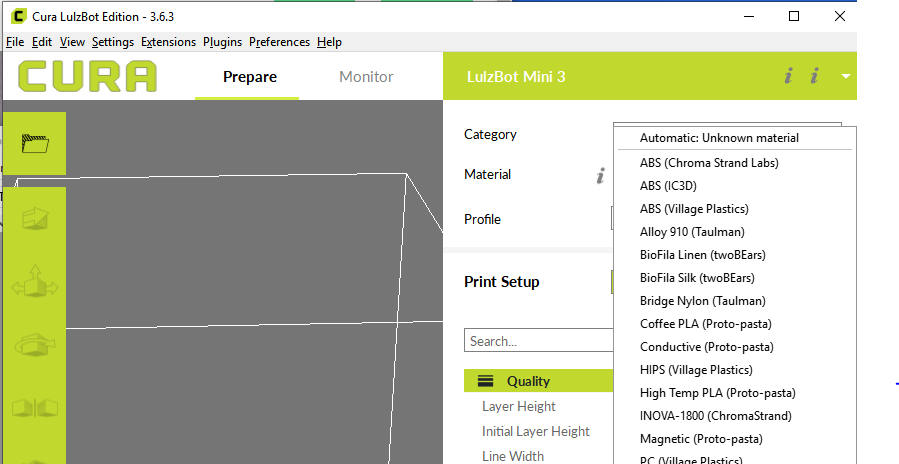
- In Cura’s Prepare window, check that the Materials selection generally matches the label on the plastic spool.
- The color-changing spool is found under Custom -> PLA -> Color Change PLA in the Materials menu listing.
- For other spools: Make sure the plastic type matches
- The manufacturer may or may not match
- The nozzle temperature / print temperature is called the “Hot End” in Cura.
- The print bed is called the “Build Plate” in Cura.
- The color-changing spool is found under Custom -> PLA -> Color Change PLA in the Materials menu listing.
- If you chose a different plastic than the previous selection, you may be prompted whether to Keep or Discard your changes. Choose Keep to use your choice.

Printing your 3D object
After you’ve connected the software to the printer, imported your shape, and verified your plastic settings, it’s time to print.
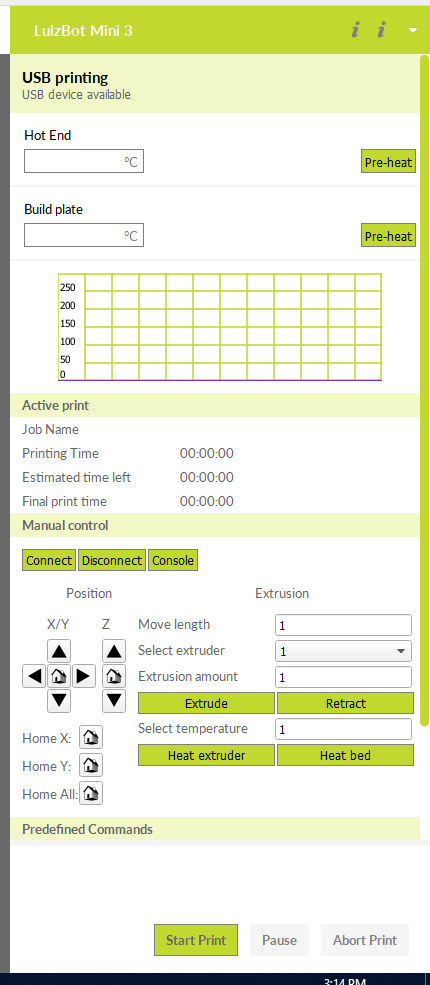
- In Monitor view, click Start Print.
- The printer will go through several automated stages before printing begins:
- Cleaning the print head at a lower temperature than the ideal print temperature
- Leveling the print surface by touching the print head to each corner and adjusting the position
- Heating the print bed and the nozzle from preparatory settings to print settings. (This may take several minutes, during which the print head won’t move. Look at the Monitor’s temperature indicator to see if this is what’s going on.)
- After the preparation is complete and printing begins, the system can estimate how long it will take to complete the print.
Tip: If this is your first print, or if you’ve just changed the plastic or its settings, print something small to verify it’s all working before beginning larger projects.
Cooling off the print bed before removing your objects
After your print is complete, the printed objects and the print bed both need to cool off. If you try to remove your objects too soon, they may warp or stick to the surface.
- Wait until the Build Plate temperature monitor drops to somewhere below 50 C and the print bed moves forward toward you.
- Use a flat bladed putty knife to gently pry your prints from the work surface.
 Join us tonight 7pm for